
- VOUCHER News: Where’s my check & when did it get cashed?
- T&E News: My Expense Report is in Budget Error Status. Now What?
- T&E News: Paying Moving Expenses for New Employees
- SUPPLIER News: What do I need to know about W-8's
- SUPPLIER News: Update on PeopleSoft Supplier Module
- TECH TIP:Quick way to find what you need in large excel files
VOUCHER News: Where’s my check & when did it get cashed?
 These are common questions at APSS and likely ones you hear as well. With the recent upgrade to PeopleSoft 9.2, some voucher lookup functionality has changed. This article will show you how to use Web Applications and PeopleSoft to look up whether a payment has been made and if the payment has been cashed by your Supplier.
First things first:
A payment will not be made until a payment request has become a voucher, gone through the approval process and has a valid budget check. So, before we check the status of a payment, we need to first make sure it has been fully approved. To learn how to see what stage of the approval process your payment is in, click HERE.
You may be wondering how the voucher approval process actually works. After you have submitted a payment request a process will run to transform your request into a voucher where it is assigned a voucher number. Once created, a voucher transitions automatically into the approval workflow if it is not in recycled status. (Recycled vouchers will be corrected by APSS or you will be contacted by APSS to correct the error.) If your voucher charges a grant chartfield string, it will route to the grant’s Project Manager(PM) for approval. Next it will route to the Fiscal Approver(s) assigned to the DeptID used on the voucher. If the DeptId has more than one approver, the voucher will route to all of them. The first one to approve your voucher will cause it to go to the next step. Lastly, vouchers route to the Accounting Office Approval level. Here an APSS employee will review the voucher.
If the payment request is not grant related, it will follow the same process above with one exception. The PM step will be skipped and the voucher will route directly to the Fiscal Approver(s) for review. In either case, once the voucher has been fully approved and contains a valid budget it will be paid during the next applicable payment cycle. This is determined by the type of payment (Check, ACH, or SUA) and the pay terms agreed to by the supplier.
It is important to note that if your voucher has not been fully approved, checking the approval status will indicate the name of the reviewer who must approve it before it travels to the next step. This information is provided so you can reach out to the reviewer to learn what is needed to advance the voucher to the next step.
Deciding to use Web Application or PeopleSoft Production to research your voucher is largely a fuction of personal preference and individual access. If you have access to both Web Application and PeopleSoft Production, we recommend using the latter as it is the only system which provides approval workflow information at this time.
Whichever system you use, you must first think about what information you already know so you know what to search for. Do you have supplier information such as supplier name and physical address? Do you have general payment information such as dollar amount or date the voucher was created? Do you have specific payment information such as voucher number, check number, or direct deposit number? The answers to these questions will help you determine which search to use in the discussion below.
Using Web Applications to see if a payment has been made and cleared the UM Bank Account:
Assuming you have your Supplier Name or Number, Voucher Number, Check Number, or Direct Deposit Number on hand, click HERE for detailed instructions for how to use Web Applications to look up your payment.
Using PeopleSoft Production to see if a payment has been made and cleared the UM Bank Account:
Do you have your Voucher Number? If so, click HERE for detailed instructions for how to use PeopleSoft Production to look up your payment. If you don’t have your Voucher Number, but you do have your Supplier Name, Supplier Number, Check Number or Direct Depost Number, click HERE.
![]()
T&E News: My Expense Report is in Budget Error Status. Now What?
 So you learn an expense report you created is in Budget Error Status. What steps should you take?
First, it is important to understand that unlike a voucher, an Expense Report will pay when all approvals have been recorded and it will then post to the general ledger once the transaction has passed all edits and has a valid budget check. When an Expense Report is submitted, the budget checking process runs approximately every hour and again during nightly processing. An Expense Report could be submitted and approved in the same day, making it possible for budget to be checked and payment issued all in the same day. If budget is not valid for the chartfields entered, the Expense Report will appear on the Budget Error (AKA, BCM) Report, however, payment will not be delayed.
What you do about an Expense Report on the Budget Error Report depends on the reason for the error. Budget may need to be entered for the transaction or changes may be needed to the chartfields on the Expense Report if they were entered incorrectly. Who can make those changes on the Expense Report depends on where the Expense Report is in the Approval process.
If you are approving an Expense Report, at the bottom of the page beneath the comments section the budget status will display. Below is a list of the statuses you will see and their definition.

- Valid – Budget Checking has completed and the Expense Report has a valid budget check.
- Not Budget Checked – Budget Checking has not yet been run on the Expense Report.
- Error in Budget Check – Budget Checking has completed but the Expense Report has not passed budget checking.
If you have already approved the Expense Report and it has paid, you will need to either enter a budget if the funding used is valid or contact APSS to have the funding updated if incorrect. So how do I know if an expense report has been paid? You can use Web Applications.
Using Web Applications to research “Paid” status of an Expense Report:
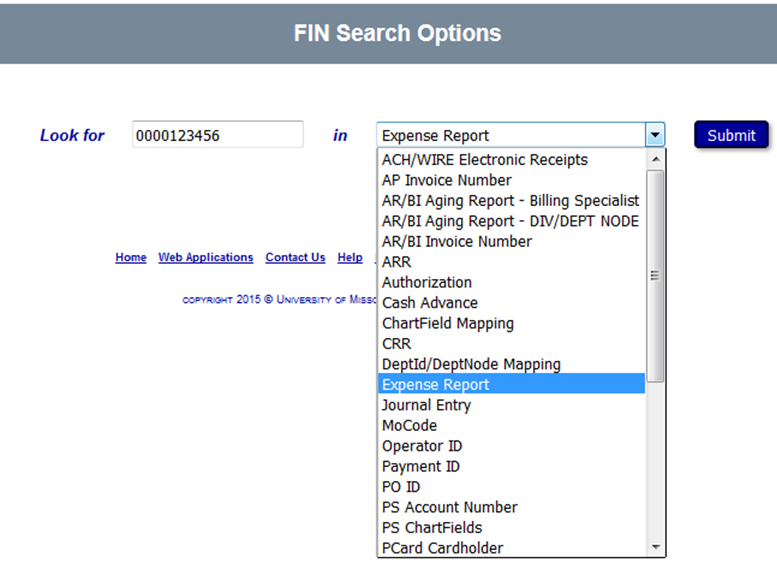
- Go to Web Applications/FIN Search Options, enter the Expense Report number in the “Look for” field, select Expense Report from the drop down in the “in” box and click “Submit”.
- You will come to a screen like the one below. Please note in the upper right hand corner it says “Paid”
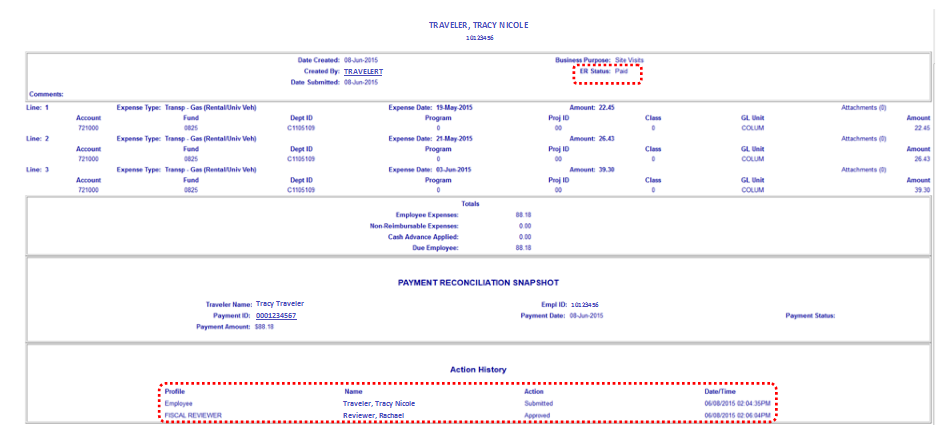
- If the Expense Report says “Paid”, you will not be able to edit it and need to call/email APSS with any needed budget/chartfield changes at 573-882-3051 or APSharedServices@missouri.edu. If the Expense Report does not say “Paid” but does say “Pending”, the Traveler or their Delegate can edit by following the instructions found HERE.
![]()
T&E News: Paying Moving Expenses for New Employees

So you have a newly hired employee moving to your campus from a different city. The subject of the University paying for their moving expenses comes up. We hope this article will shed light by providing the “top 10” most frequently asked questions and policy based answers. To review the documentation supporting these answers, please refer to HR-103, BPM 214, and APSS Website Moving Expenses Page.
Q: Is it policy that the University must pay moving expenses?
A: No. Moving expenses may be authorized when it is in the best interest of the University. Per policy, paying moving expenses in not guaranteed, it is merely allowable subject to approvals. Please be careful not to commit to paying for moving expenses without gaining the appropriate prior approvals first.
Q: Who authorizes the payment of moving expenses?
A: All moving expenses must be authorized by the President, Vice President, Chancellor, Hospital Chief Executive Officer, or a designee.
Q: Is there a maximum dollar amount the University will pay for moving expenses?
A: Yes. For new employees, moving expenses are not to exceed 10 percent of the employee's annual salary or the actual cost of moving, whichever is the lesser.
Q: Is there a minimum distance from the employee’s old home to their new work location before moving expenses will be allowable?
A: Yes. Moving expenses will be paid only if the employee's new place of work is at least 50 miles farther from the employee's former home than the previous job location was from the employee's former home.
Q: Does the timing of when an employee claims reimbursement of moving expenses matter?
A: Yes.
If the request for reimbursement for moving expenses is submitted to the hiring department within 60 days of being paid or incurred, the expenses will be reported as non-taxable on the employee’s W-2.
If the request for reimbursement for moving expenses is submitted to the hiring department after 60 days of being paid or incurred, they will be reported as taxable income on the W-2.
If the moving expenses were not incurred within one year, the employee must show that circumstances existed that prevented the move within the one-year time. Exceptions may be made in accordance with Internal Revenue Service guidelines.
Q: If approved, are all moving expenses allowable?
A: No.
Expenses that are allowable include:
- cost of a rental truck or trailer
- cost of supplies needed for packing, crating, and transporting household goods and personal effects of the employee and those of the members of the employee’s household from their former home to their new home
- cost of shipping a car to the new home
- cost of shipping a household pet to the new home
- cost of storing and insuring household goods and personal effects within a period of 30 consecutive days from the day the items are moved from the former home until they are delivered to the new home
- cost of connecting or disconnecting utilities.
- cost of assistance in loading and unloading
- cost of gas if using a rental vehicle
- mileage allowance if using a personal vehicle
- lodging while in route.
Expenses that are not allowable per IRS PUB 251 include:
- cost of meals consumed while traveling
- cost of meals consumed while living in temporary quarters
- cost of temporary living quarters
- cost of selling or settling an unexpired lease on the former residence
- cost of house hunting
- cost of any part of the purchase price of your new home.
- cost of Car tags.
- cost of Driver's license.
- cost of buying or selling a home (including closing costs, mortgage fees, and points).
- cost of home improvements to help sell your home.
- cost of Loss on the sale of a home.
- cost from disposing of memberships in clubs.
- cost of Mortgage penalties.
- cost of real estate taxes.
- cost of refitting carpet and draperies.
- cost of return trips to your former residence.
- cost of security deposits (including any given up due to the move).
- cost of storage charges except those incurred in transit and for foreign moves.
Q: Are there tax implications for new employee if they elect to be reimbursed for moving expenses?
A: In accordance with Internal Revenue Service regulations, all reimbursements to employees for moving expenses will be reported on their W-2. It is the employee's responsibility to determine the taxability of such payments.
If the request for reimbursement for allowable moving expenses is submitted to the hiring department within 60 days of being paid or incurred, the expenses will be reported as non-taxable on the employee’s W-2.
If the request for reimbursement for allowable moving expenses is submitted to the hiring department after 60 days of being paid or incurred, they will be reported as taxable income on the W-2. If an employee is reimbursed for non-allowable moving expenses. Those expenses will be reported as taxable compensation to the employee regardless of the timing of the submission.
Q: Are there options for how Moving Companies can be paid?
A: Yes. Moving companies can be paid directly by the University. Moving Companies can be paid by PO Voucher if the company requires a PO number. If a PO number is not required, Moving Companies can be paid by Departmental Pcard or Non-PO Voucher.
Q: Are there options for how employee reimbursements can be paid?
A: No. Completing an Expense Report in the T&E module is the only option. Non-PO Vouchers and others forms of payment are prohibited. This is due to the University’s utilization of the T&E module for tracking and integration with payroll to comply with Internal Revenue Service regulations. Therefore, employees must be active within myHR before they can be reimbursed.
Q: Is there mandatory documentation I should include when paying moving expenses?
A: Yes. Please include:
- copy of itemized receipts for all expenses claimed
- copy of position offer letter
- copy of PAF
- For expenses being claimed for reimbursement only: Employee Moving Expense Reimbursement Request and Summary Form (UM-17)
![]()
SUPPLIER News: What do I need to know about W-8's
 To make sure taxes are accounted for and paid properly by US residents and US companies, we are all familiar with completing W-9 forms. This is the basis for APSS’s requirement that all new US supplier submissions have a completed W-9 attached.
But W-9s are just for US individuals and companies. So, what form do you use if you need to set up a Supplier who in not a US citizen or company? The short answer is you need to attach a completed W-8 form.
However, there are several different versions of the W-8 form and knowing which one to use can be complex. For this reason, every campus has a Nonresident Alien Taxation Specialist you can reach out to for guidance.
For the purposes of this article, we are going to focus on the W-8BEN and W-8BEN-E since they are the right form in the vast majority of submissions to APSS.
W-8BEN:
Used primarily by individuals to claim foreign status or treaty benefits. It is also used by an individual to claim treaty benefits for royalty/passive income. For instructions on completing this form, click HERE.
W-8BEN-E:
Used primarily by entities to claim foreign status or treaty benefits. For instructions on completing this form, click HERE.
- Note: If neither of the forms above applies, please reach out to your Nonresident Alien Taxation Specialist for guidance on which form to complete. This includes, but is not limited to the following situations.
- If you have knowledge the new Non-US Supplier receives income connected with the conducting of trade or business within the United States, this may require a different form.
- If you have knowledge the new Non-US Supplier wishes to claim exemption from tax withholdings because they are a: foreign government, foreign tax exempt organization, foreign private foundation, government of a U.S. possession, or foreign central bank of issue, this may require a different form.
- If you have knowledge the new Non-US Supplier is an intermediary, a withholding foreign partnership, a withholding foreign trust, or a flow through entity, this may require a different form.
![]()
SUPPLIER News: Update on PeopleSoft Supplier Module
 We are happy to report as of August 28th, the major issues have been resolved within the Supplier Registration module! Thanks to all of you, the users of the new system, as you played an integral part identifying issues and reporting them to us! Your feedback was tracked, organized and communicated to the UM System team. From there, that team used your input to labor tirelessly to get the Supplier Registration module up and running. Thanks again for all your help!
A couple things to note about the new system:
- No need to email attachments anymore. Please attach W-8, W-9, and Direct Deposit Forms using functionality within the system. Click HERE and review pages 4-5 of the attached guide for instructions on how to attach documents.
- Upon submission of a supplier registration, you will first receive a confirmation email with your individual registration ID number. After the registration has been reviewed you will either receive an email approving or denying your request. If it has been approved, the email will contain the new Supplier ID. If it has been denied, the reason for the denial will be in the email.
![]()
TECH TIP: Quick way to find what you need in large excel files
Excel is more than just a spreadsheet tool. It has lot of built in functionality to analyze data quickly. For this article, let’s start with a hypothetical situation to illustrate the power of the Filter function.
Scenario:
Your supervisor asks you to work with a specific professor who is doing research related to interactions between people and guide dogs. She needs to purchase 10 guide dogs matching specific criteria and has provided a spreadsheet with 10,000 different potential dogs. Here are the criteria she is looking for:
- She is only interested in studying Labrador Retrievers, Golden Retrievers, and German Shepherds.
- Budget is a factor and she wants to spend under $175 per dog or no more than $1750 total for all 10 dogs.
- She needs the dogs either picked up by staff or delivered, she wants to keep the cost of shipping to a minimum, so she is only interested in purchasing qualified dogs in Missouri or states which touch Missouri.
- She wants dogs that are at least 2 but less than 10 years old
- She wants dogs that like eating either Purina or Eukanuba dog food
- She wants the dogs to weigh between 50 and 75 lbs.
Your job is to comb through her spreadsheet and provide her a list of 10 dogs matching the criteria she needs. So, how do you go about sifting through 10,000 rows of data to find this information? We arrived at a list of the 10 best dogs matching her criteria in less than 6 minutes following the steps below. Please click HERE, open the sample excel file and follow along to see how we did it.
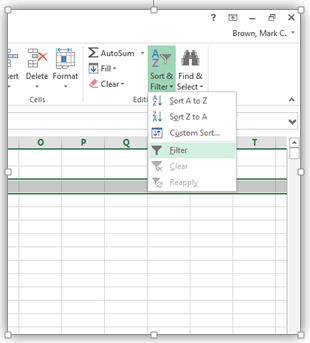
- Left click on your row of titles (Row 3) to highlight them. In the upper right hand corner of your screen click “Sort & Filter”, then click “Filter”.
- You will notice there is now a drop down box you can click on for each column.

- We can click on each of these drop downs menus to enter the specific criteria our professor wants. This will narrow down our 10,000 records to just the list she is looking for.
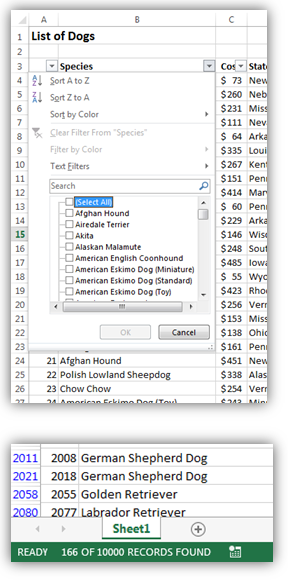
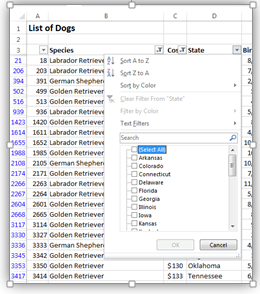
- Species Column: Click on the dropdown arrow in the “Species” column, then click the “Select All” box to uncheck all the types of dogs. Then select just German Shepherds, Golden Retrievers, and Labrador Retrievers and click OK. Looking in the bottom left hand corner of the screen, you can see our 10,000 list has now been reduced to 166.
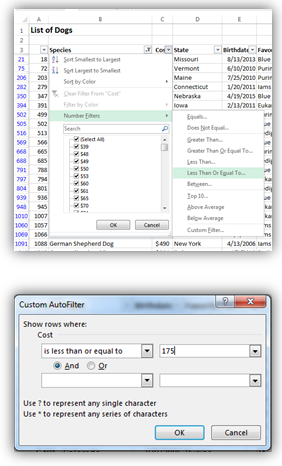
- Cost: Click on the dropdown arrow in the “Cost” column, then click “Number Filters”. A dropdown menu will open with various options to choose from. Since the professor does not want to pay more that $1750 total, it would be reasonable to filter for dogs costing $175 or less. To do so, click on “Less than or Equal To”. Another box will open that will allow you to enter a numerical value. Enter 175 and click OK. Keep in mind, any of the criteria we enter in our filters can be changed later if our search does not yield sufficient results. Our 166 records have now been reduced to 54.
- State: Click on the dropdown arrow in the “State” column, then click the “Select All” box to uncheck all states. Then select just Arkansas, Illinois, Iowa, Kansas, Kentucky, Missouri, Nebraska, Oklahoma, and Tennessee, then click OK. Our 54 records have now been reduced to 29.
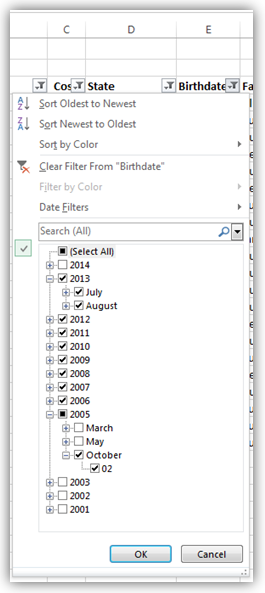
- Birthday: Let’s assume the date is 10/1/2015 and we want the dogs to be 2 or more years old and also 10 or less years old. That means their birthdays need to be at least 10/1/2013 or earlier and 10/1/2005 or later. Click on the dropdown arrow in the “Birthdate” column. This will open up a box showing all the birthdates categorized by year. If you click on the plus sign next to a year, it will drop down that year’s months. If you click on a particular month’s plus sign, it will drop down that month’s days. So, we need to uncheck all of 2001, 2002, 2003, March and May of 2005, all of 2014 then click OK to, reduce the birthdays to the desired range. Our 29 records have now been reduced to 21.
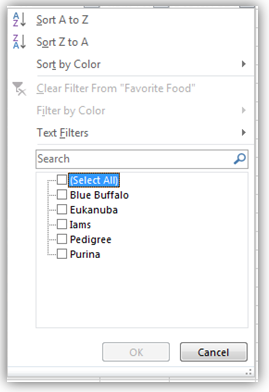
- Favorite Food: Click on the dropdown arrow in the “Favorite Food” column, then click the “Select All” box to uncheck all foods. Then select just Eukanuba and Purina and click OK. Our 21 records have now been reduced to 15.
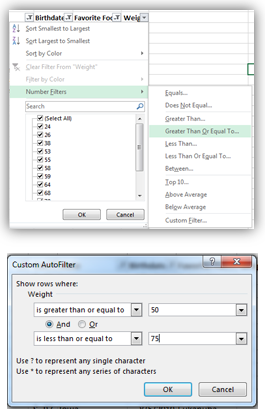
- Weight: Click on the dropdown arrow in the “Weight” column. We need another range here. This time between 50 and 75 pounds. So, click on “Number Filters”, then “Greater Than or Equal To”. Another box will open that will allow you to enter a numerical range. Enter 50 in the box to the right of the “is greater than or equal to” field. Then in the two boxes below, select “is less than or equal to” in the drop down box, enter 75 to the right of it, then click “OK”. Our 15 records have now been reduced to 12.
- You now have a list that matches all the professor’s criteria except she wants 10 dogs and you have a list of 12. From here, I would click on the cost button and sort from smallest to largest. Then eliminate the bottom two rows as they are the most expensive, and as luck would have it, not located in Missouri. Doing so would yield you the following list at a total cost of $1066. Well below the professor’s budgeted $1750.
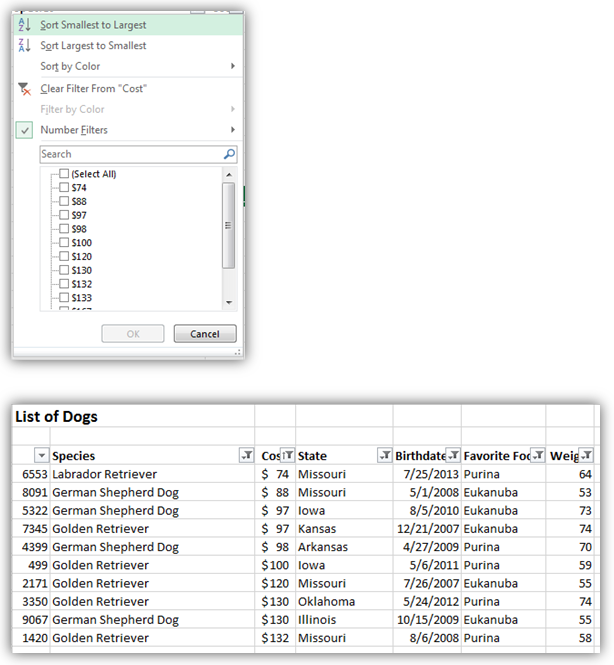
- Species Column: Click on the dropdown arrow in the “Species” column, then click the “Select All” box to uncheck all the types of dogs. Then select just German Shepherds, Golden Retrievers, and Labrador Retrievers and click OK. Looking in the bottom left hand corner of the screen, you can see our 10,000 list has now been reduced to 166.
*Note: For additional information of Microsoft Excel’s filtering function, click HERE.
Reviewed 2021-09-22