
NON-PO News: Avoiding Errors with Non-PO checks
Do you create Non-PO Vouchers? If so, did you know there are two common errors that may cause a duplicate payment or the vendor not being able to apply payments correctly?
They are incorrect remittance information and incorrect invoice numbers. Luckily, both are easy to prevent if you know what to look for.
Remittance Information Errors: To ensure checks are mailed to the correct location, make sure you verify your voucher’s remittance information is correct by following the steps below:
- Go to Accounts Payable > Vouchers > Add/Update > Regular Entry > Add a New Value Tab
- Enter your vendor number
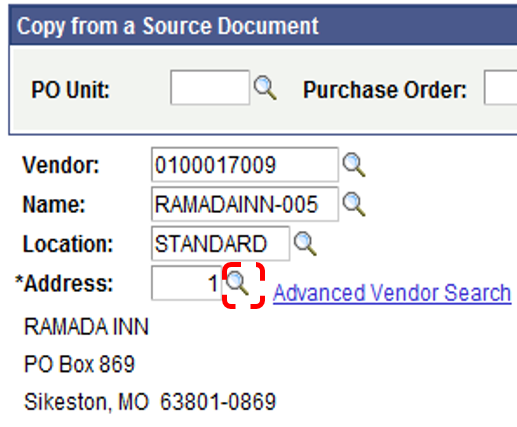
- If the address where your vendor’s check is to be mailed to is in the address block (circled in red below), you are in good shape. If not, go to step 4.
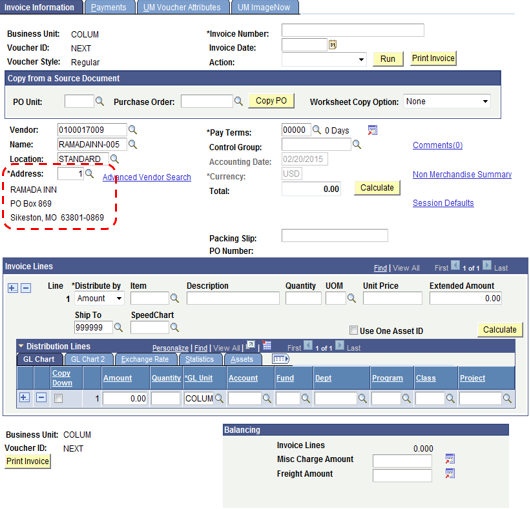
- Click on the magnifying glass (See image below) just to the right of the Address Field.
- This will open a screen (like the one below) which will show you ALL the addresses we have for a particular vendor.
- Do you see the correct address to mail your vendor’s check to? If so, select it. This will repopulate the remittance address with the correct address information you’ve just selected. If not, go to step 7.
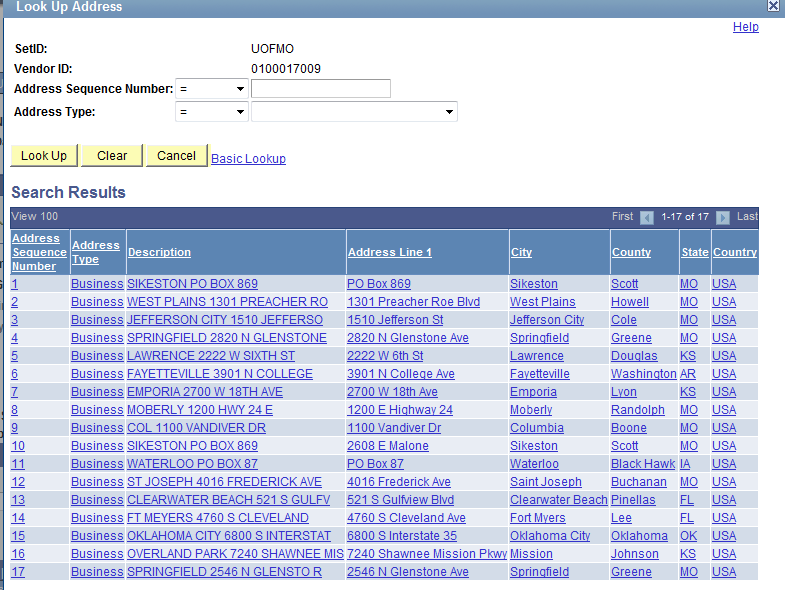
- If the address you need the vendor’s check mailed to is not listed, you will need to complete a “Request New/Change Existing Vendor Form” in PS Production. For instructions on how to complete this form, click HERE.
Invoice Number Errors: If you have an invoice to attach to your voucher, make sure you include its invoice number and invoice date. Here is how you do it:
- Go to Accounts Payable > Vouchers > Add/Update > Regular Entry > Add a New Value Tab
- Enter your vendor number
- In the upper right hand corner there are two fields. One for Invoice Number and one for Invoice date.
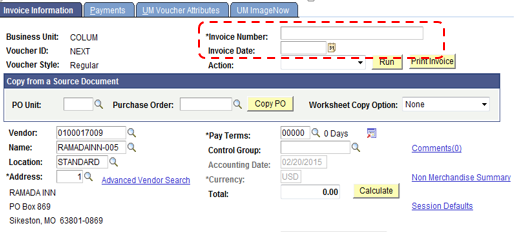
- Using the Ramada Worldwide Invoice below, you would reference invoice #17547 in the Invoice Number field and 3/24/2014 in the Invoice Date field.

- Entering these two fields of data helps to prevent errors by giving PeopleSoft the data it needs to search for duplicate invoice numbers. This helps to ensure a duplicate voucher does not exist and the invoice has not already been paid.

T&E News: HR Changes can Delay T&E Transactions
I bet you already know Expense Reports and Cash Advances are processed through the Travel and Expense Module in PS Production and I bet you already know when an employee has any sort of change to their payroll, a Personal Action Form (PAF) must be completed to get their changes processed.
That said, many people don’t know the PAF and Travel and Expense systems are not integrated. So when a PAF is completed to change an employee’s chartfield string where their payroll is charged, it is not automatically changed in Travel and Expense. If nothing is done to sync up the two systems, after a PAF is completed and you try to process an Expense Report or Cash Advance, it causes problems at the Accounts Payable Shared Services Center that take time to research and resolve… meaning delays in your transactions being processed.
How can this be prevented? As a part of your checklist when processing a PAF, make sure to update the employee’s Travel and Expense Default Profile with the new chartfield string information. The Default Profile should be the first line of funding on the PAF; however, if this is a grant chartfield we suggest moving to the next line of funding to avoid additional errors when the grant project ends.
Who can make these edits? The employee, their HR Supervisor, or their Fiscal Reviewer.
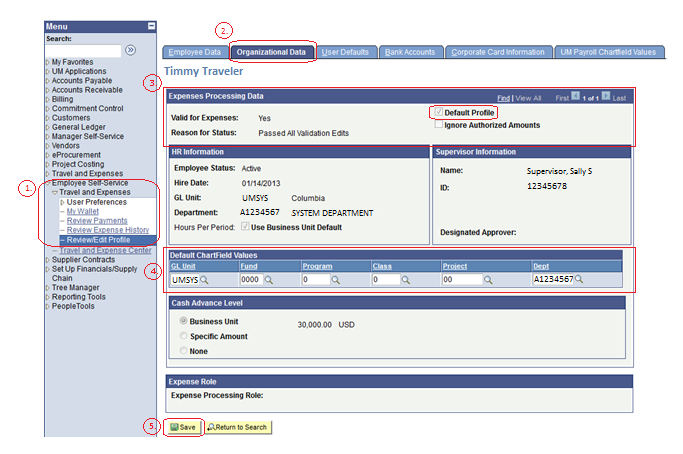
How does the Employee make these edits? (See image below):
- Go to PS Production>Employee Self Service>Travel and Expenses>Review/Edit Profile
- Click on the Organizational Data Tab
- Please be sure you are updating the “Default Profile”. You can tell this by looking in the upper right hand corner of the Expense Processing Data Section. The “Default Profile” will be the one with a
 in the “Default Profile” checkbox.
 - Under the Default Chartfield Section, change the chartfield information as necessary
- Click Save
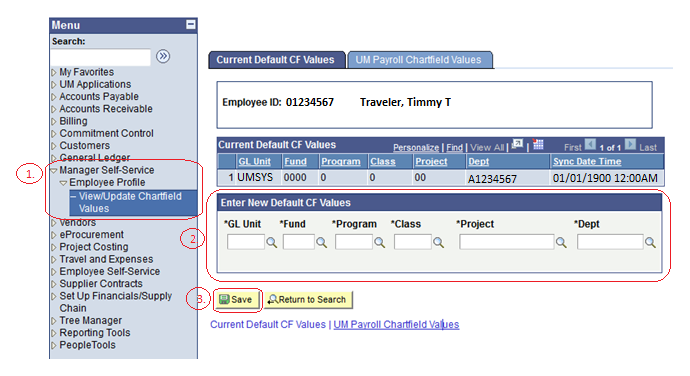
How does the Supervisor or Fiscal Reviewer make these edits? (See image below):
- Go to PS Production>Manager Self-Service > Employee Profile > View/Update Chart field Values
- Enter the new chartfield information
- Click Save
T&E News: Tips to get your Expense Report paid Faster
Tip 1: Why wait to get reimbursed? If you have access to the internet, you can complete your expense report while you are in travel status, no need to wait until you return to the office or the end of a long trip.
Tip 2: Let’s say you have four of the five items needed to document a recent trip per policy, but you are waiting on the last one to complete your Expense Report. It doesn’t hurt to have two expense reports for the same trip so you can get reimbursed timely for the four expenses you DO have documented for now. For the last expense, just do another expense report once you have received the missing documentation and reference the first ER # in the comments for auditing purposes.
Tip 3: Remember to account for expenses within 60 days after the end of your trip, or, within 60 days after the expense was incurred.
Tip 4: If an expense report is submitted after the 60 day deadline, remember that documentation explaining the reason for the late submission must be provided. Additionally, reimbursement may be subject to the availability of funds and the department’s discretion to deny reimbursement. If reimbursement is approved by the department, the reimbursement may be added to the employee’s taxable compensation as outlined in BPM 505.
Tip 5: To avoid these and other complications, please refer to the Accounts Payable Shared Services’ (APSS) website for questions concerning the Travel and Expense Module. If you need more detailed information, please send inquires to APSharedServices@missouri.edu.
VENDOR News: 2014 1099’s Clarification
The last edition of Your APSS Update contained an article called It’s 1099 MISC Time Again! It detailed what a 1099 is, who will receive one, and when they will be sent out.
The 1099’s were sent out in late January as mentioned in the article. Since then, the most frequently asked question has to do with a timing issue for voucher created in the last few weeks of December.
The Scenario:
Let’s say a voucher was created in 2014 for a product or service the department knew would not be provided by their vendor until 2015. The product or service was indeed provided in 2015, the vendor received payment in 2015, yet the vendor received a 1099 for the year 2014! How could this happen? Two ways. First, a hold check could have been requested in 2014 and not sent to the vendor until the product or service was provided the following year. Second, the voucher could have been created on one of the last days of December and not received by the Vendor until January of 2015. In either case, the Accounts Payable Shared Services Center would send a 2014 1099 to the vendor since the check was cut in 2014 and we would have no way to know when the products or services were actually provided.
The Concern:
This scenario has caused a small number of upset vendors to call APSS letting us know they did not provide their product or service in 2014, did not get paid in 2014, and thus should not receive a 1099 in 2014. In many cases, they are correct. Upon learning this, APSS has to research the situation, in some cases make multiple adjustments to the Vendor’s records, and in some cases resend corrected 1099’s to vendors.
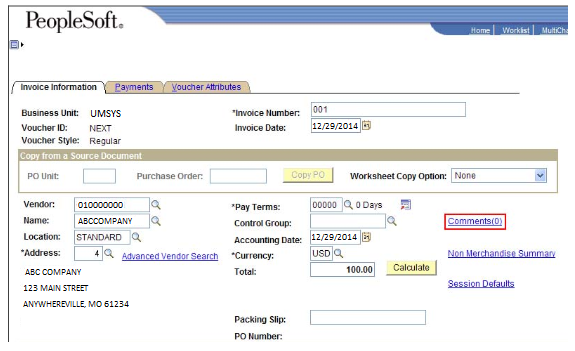
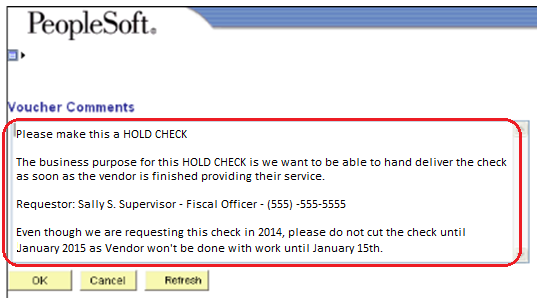
The Remedy:
When creating vouchers late in December, or when you are creating a voucher for work you know won’t be completed and payment won’t be sent to the vendor until the next calendar year, please write a note in the comments section (See images below) specifying a date in the next calendar year when the payment should be released. That way payment will not happen until the year the product or service is provided, ensuring APSS will send the 1099 in the correct year. For your convenience, below are some screenshots showing how to document this situation correctly when creating vouchers.
VENDOR News: New Resource for Editing Existing Vendors
Based on client inquiries regarding existing vendor edits, we have upgraded content on your APSS website. If you work with existing vendors, you may want to bookmark THIS PAGE for future reference. The page covers the following:
- Requesting Address Changes for Existing Vendors
- Requesting Address Changes for Existing Vendors with Restricted Addresses
- Requesting Name Changes for Existing Vendor
- Requesting TIN or SSN Number Changes for Existing Vendor
- Uploading a new W-9 for an Existing Vendor
- Requesting changes for Non Resident Existing Vendor
TECH TIP:Oh no! I didn’t hit Save… :(
It’s happened to everyone. You’re on a deadline and the pressure is on. The Microsoft Word, Excel, or PowerPoint file you’ve been spending countless hours perfecting is nearly done. In a moment of “less-than-brilliance”, you get annoyed with too much clutter on your desktop and start closing down browsers and programs you’re not using. Then you realize what you’ve done, “Oh noooooo! I didn’t hit save@#$^&*!!!”
Panic sets in. You may well have permanently lost your file, but before you bang your face against your monitor in shame and disgust, there are a few things you can try. Of course you could contact IT as they are likely to have much more sophisticated methods of file recovery at their disposal. Before you do so, and assuming you have Office 2007 or older, you could try some of the methods located HERE.
If you have Office 2010 or 2013, your situation may be even brighter. The following steps work for Excel, Word, and PowerPoint:
- Click File
- Click Open
- Click Recent Workbooks (in Excel)
or
Recent Documents (in Word)
or

- Use the slider bar on the right side of your screen to scroll down to the bottom of your recent documents and look for an icon labeled: Recover Unsaved Workbooks
- Click the Recover Unsaved Workbooks icon

- A list of documents the program has auto-saved will open up. With any luck, the one you need is one of them. If so, congratulations as your disaster has been averted. ;)
Reviewed 2025-06-17